Tuesday, February 4, 2014

The Oil Cleansing Method

It's been so long since I have posted, I decided to start back with an amazing topic. Oil cleansing.
I'm not going to go too far into explaining it. I'll post links at the bottom for your researching pleasure, though!

What Is It?

Oil cleansing is exactly what it sounds like, cleansing your skin with oil. Don't run away yet! I know how it sounds, kind of crazy, right? Cleansing my dirty, oily skin with more oil? Well, let's think about it. Commercial cleansers are made to strip away the make up, dirt, oils, etc. from our skin. When we take natural oils away from our skin, it signals our body to make more. This often makes our bodies overproduce oil. It definitely did for my skin! As far as how the oil actually cleanses your skin, I'm not going to pretend I'm an expert. While I was researching the method and how it works, I found that oil actually dissolves oil. To me this means you'll be cleaning your face the most natural way.

I have been using this method for about a month. My face overall has seen huge improvements, huge! I used to get annoying bumps on my forehead, around my hairline, along with bigger pimples around my chin, and a few at random places on my face. Since I have been using it, I still get a few blemishes around my chin, but overall it has changed my skin for the better. When I used a commercial cleanser on my face at night, I would wake up with so much oil that I had to cleanse when I woke up. Now, I cleanse at night and just splash my face with water in the shower in the morning. I haven't used moisturizer on my face since I started this method, I simply don't need it. I'm not saying this will be the case for everyone. Sold yet? If not, look at my before/after pictures only a week after switching.

Disclaimer: All the pictures I'm sharing are taken from my phone. I  happen to have the worst iPhone camera of all iPhone owners, so I apologize.

These pictures are exactly one week apart. I'm wearing no make up other than a little mascara. I realize the lighting is different but looking past that you can see the huge improvement it has made.

How To:

Now on to how you actually do the oil cleansing method. The main thing you'll obviously need is oil. Everyone's skin is different, so you have to find the oil that fits your needs best. I found Crunchy Betty's list to be very helpful when trying to find the best oils for my skin type.

http://www.crunchybetty.com/nitty-gritty-on-the-oil-cleansing-method

After reading her blog I decided to use Caster oil, avocado oil, and apricot kernel oil. These fit my needs and were in my price range. The first mixture I made was for normal skin types, which is equal parts caster oils and carrier oils. That seemed too drying for my skin, so I switched to the dry skin formula which is one part caster oil to two parts carrier oil. If you are worried about it being too expensive for you let me show you why it's not.


Here are my 3 oils. 16 fl oz, 8.5 fl oz, and 8 fl oz.


There are 3 teaspoons in this container. For my skin type I do one tsp of each oil. This lasts me about 9 days, using about a quarter sized amount once a day.


I've been doing this about a month, and today I mixed my third batch. The initial cost is a little daunting, but it will last you a long time as you can see. 

Now let's get to how you cleanse your face with the oils. 

Step 1. Dampen your face with warm water. (I have read to do this, as well as not to. I do this personally, but do whatever you think it best)

Step 2. Put the oil in your palm, and rub your hands together. Rub the oil on your face in an upward manner. When you get to around your eyes use only your ring fingers and move from outward, in. (This is the cosmetologist in me, you don't want to pull on your skin and give yourself wrinkles!) Massage for about 2 minutes. I find the massage really important. On the days I feel lazy and only rub the oil enough to put it on, my skin doesn't feel as clean.

Step 3. Let the oil sit on your face for 30 seconds or so. I usually take that time to brush my teeth.

Step 4. With fairly warm water, saturate your wash cloth and remove the oil from your skin. Still being gentle and in an upward manner. 

You don't need to remove any of your make up before doing this. It takes everything off including mascara.

If you have blemishes starting to show up, you can use a q-tip with tea tree oil (aka melaleuca oil) or any other oils that you find effective and put it on the pimple rather than store bought, chemical filled creams.


Where To Buy: 

I'm sure you can find these oils at your local health food store. I would suggest buying organic and cold pressed oils. This means they are in the purest form so they can benefit your skin like you are wanting them to. I bought mine online. Mostly because I'm lazy and don't want to go store to store to find the right kind. Also because it can be pricey in health food stores. I found mine here:


Great prices and it came in about a week if I remember correctly. 


Here are a couple other good sites to read about oil cleansing along with the site mentioned earlier:


Saturday, April 27, 2013

DIY "Crunchy" Recipes

I wish I could use all natural products that cost a leg and your first born child to buy. No preservatives, all natural, organic, make your insides sing with joy, you know, the good stuff. Since I haven't won the lottery yet, I've been finding ways to make them myself so I feel a little better about what I'm using on my family's skin and in our bodies. I know it's becoming more "popular", if you will, to eat healthy and use natural products, so I figured I'd share my few recipes with you guys.


Homemade Laundry Detergent

Liquid Detergent

Ingredients:

  • 1 bar of soap (I use Ivory, but any natural bar of soap will work)
  • 1 cup of borax 
  • 1 cup of washing soda
  • 1 bottle of Downy Unstopables *optional*
  • 5 gallon bucket
Directions:
  1. Grate the bar of soap. You can either do it by hand or use your food processor. I'd recommend food processor. It's just soap, so it cleans off very easily.
  2. Put the grated soap and 2 quarts of water into a pot and gradually heat until the soap is completely dissolved. I usually use medium-high heat so that it doesn't boil. I have an old top loading machine and don't use fabric softener. During this step I like to add a whole bottle of downy unstopables and melt it with the soap and water. I know, not necessarily "natural" now, but I like the smell. 
  3. Fill your 5 gallon bucket with 4.5 gallons of hot water. (If you have a kitchen sprayer, use it. It makes this step a lot easier) 
  4. Mix in your borax and washing soda, stir until it's completely dissolved .
  5. Add your soap mixture to the bucket and stir very well. 
  6. Cover your bucket and leave it for 24 hours. 
  7. Use 1/2 cup to 1 cup per load. 
While it sets for the 24 hours it will have separated. Just use a big spoon and mix it up again. It will also be a little chunky. Don't worry, that is how it's supposed to be. I pour some in an old detergent bottle and shake it right before I go to use some so it is always mixed. 

Powder Detergent

Directions:
  1. Grate the bar of soap. 
  2. Mix 2 cups borax, 2 cups washing soda, and the grated bar of soap. 
  3. Store in a sealed container. 
  4. You can also add Downy Unstopables in the mix, not sure how much you'd need, I only make liquid.
  5. Use 1/8 cup to 1/4 cup per load. 
On a side note, if you cloth diaper, don't use this detergent on your diapers. The bar soap can cause build up and make your diapers repel water.


Baby Wipes / Make-up Remover Wipes

Ingredients:
  • 1 container with a lid. I use a 7 cup Rubbermaid container. 
  • 1 roll of select a size paper towel. I use bounty, and have heard Viva works well too.
  • 2 cups of water
  • A heaping spoonfull of coconut oil
  • A couple squirts of baby wash. OR facewash if you are using them for makeup removing wipes.
Directions:
  1. Cut your paper towel roll in half using a non-serrated kitchen knife. I suppose you could use serrated knife but you'd have a lot of fuzzies you'd have to try to wipe off. 
  2. Put your heaping spoonfull of coconut oil in a microwave safe bowl and cook until just melted. Usually only takes about 15 seconds or less depending on your microwave and how warm your house is already. 
  3. In a measuring cup add 2 cups of purified, boiled or distilled water. This part is important. If you use just tap water you can easily grow mold in your container. If you chose to boil your water, let it cool down before starting the next step.
  4. To the water, add your coconut oil and a couple squirts of baby wash. Stir until mixed.
  5. Pour half of the mixture into the container. Place one half of the paper towel roll in the container and pour the rest on top. 
  6. Push the roll down with the lid and seal it shut. 
  7. Lay it upside down for 5 minutes, then right side up for another 5. After that you can open it and remove the cardboard in the middle and they are ready to use!
If these are too wet for your liking just cut the water down to 1 1/2 or 1 cup total. I started using this recipe with 1 cup and it wasn't enough for me. 

Remember that even though these have soap and coconut oil in them, they can still grow mold if you keep them in a dark place. I just keep mine on the changing table and I haven't had a problem as long as I used purified water.


Vinegar 

If you are looking to get rid of all of your harsh cleaners, I can't help you. I love cleaning with Lysol or Clorox and leaving my kitchen and bathroom smelling like bleach. Plus I know that I've killed all those nasty little germs and I won't be getting e coli. Maybe someday I'll transition more natural, but that's not happening anytime soon. I do have a couple ways I use vinegar that I can share. 

Cleaning the Washing Machine: 

I take a rag and drench it with vinegar. With that rag I wipe down everything, inside and out of the washing machine. After that I fill my machine with hot water and add 1 cup of vinegar. I let the water sit for about 30 minutes, then drain it and do a rinse cycle. 

Washing my towels:

Do you ever notice after time your towels smell a little musty, even after you wash them? I add maybe 1/2 cup of vinegar to my towels with the detergent (I just pour it in, I don't measure). It makes them smell fresh again with out using bleach or anything harsh!


Cream of "Anything" Soup Substitute

Ingredients:
  • 2 cups powdered non-fat dry milk
  • 3/4 cup corn starch
  • 1/4 cup chicken bouillon 
  • 2 Tbs dried onion flakes
  • 2 tsp Italian seasoning  
Directions:
Mix together all the ingredients and store in a ziplock bag or sealed container.

To create soup:
  1. Wisk together 1/3 cup of dry mix with 1 1/4 cups of cold water in a small pan. 
  2. Cook on medium-high heat, stirring frequently until the sauce thickens.
This recipe will make the equivalent of 9, 10oz cans of soup.


There are other food substitutes and ways of making your meals healthier, but I don't feel like getting into that. I just wanted to share this awesome soup recipe. It's cheaper than canned, gluten free, and most of it you probably have on hand at your house anyway. I've been using it for about a month and I haven't noticed a difference in taste in any of my recipes. I've even used it as a sauce on my pasta on one of those "Oh crap, I have nothing to make for dinner" nights. 

I'm always searching Pinterest for new "crunchy" ideas. Once I find a few keepers, I'll add more!


Tuesday, March 12, 2013

Preparing and Washing Cloth Diapers

Just like most cleaning routines, there are a lot of different ways and opinions on how to go about prepping and washing diapers. As I've said before, I'm only giving you basic instructions, the rest is my personal opinion. 


Prepping

When you buy a new diaper you want to prep it for a couple reasons. The first reason being that you want to get all the dust and grime that is on it from being made and packaged. You wash your new clothes and underwear before you wear it, right? The same concept applies to diapers.  The second reason is for maximum absorbency. Most natural fibers become more absorbent the more they are washed and used.  In this process you will be helping it along for better absorbency in your diapers and inserts.

Synthetic Materials

These are the easiest and least time consuming diapers to prep. Most pocket diapers, and covers would fall under this category, microfiber inserts would as well. All you have to do for these is put them through one of your regular wash routines. (I'll talk about routines a little later in this post.) You'll want to dry them in the dryer with heat to seal the PUL (polyurethane laminate). After drying once, you can line dry if you prefer. 

Natural Fibers

These take a little more time to prepare before you use them. Cotton, hemp, and bamboo are considered natural fibers. You will want to do these separate from your synthetic materials. They have oils in them that you are trying to wash off, if you mix them with your synthetic it could cause the oils to stick them and make them not as absorbent. I've heard a couple different ways to prep these. I will share both ways with you. I can't say what has worked for me because I've only bought used natural fiber inserts, so I've never had to do the initial prepping. 

The most common way is to wash and dry them about 5 times. You can wash them fewer times and it wouldn't be harmful. It just wouldn't absorb very well and you may end up disliking them because you haven't experienced their maximum absorbency.

Another method I have heard is boiling them in water on the stove in a large pot. The average I have heard is 30 minutes, and to do it once or twice with no detergent, just water. Then to wash them normally in the washer, and you're done.  

Like I said, I can't tell you which one has worked for me, but I know people that have used both methods and had it work well. As my friend Alicia put it so perfectly " It's kinda like you are trying to pre-age them just enough, mimicking wear and tear that would normally take weeks or months." 


Wash Routines

Now we get to talk about detergents and how to care for your diapers after you do the initial wash. 

You're going to hear a lot of different opinions on what detergent works best, what temperature to wash on, how many rinses to do. You just have to do what works for you. It's a lot of trial and error, unfortunately. The reason there is not one answer is because there are so many variables. If one person has well water, and one has hard water that is chemically treated and both use different types of diapers, they most likely will need different routines.  

There are a few things that should be the same in everyone's routine. 

  • Whatever detergent you decide to use, it should not contain softeners or brighteners. It can build up on your diapers and the brightener can be harsh on them. You also won't want to put a dryer sheet in the dryer with them for the same reasons. 
  • You only want to use 1-2 Tablespoons of detergent (sometimes more depending on your trial and error). I know, you are thinking there is NO way 1-2 tablespoon of detergent will clean my child's poopy diapers. I thought the same thing, but I promise it does. 
  • When you are washing diapers I would only recommend washing 20 or less at a time. Any more and it won't have the room to agitate and clean properly.
  • No matter how many diapers you are washing, you should put your water setting on the highest level to make sure it's getting washed and rinsed properly. (I don't have an HE washer, so I'm not sure how that works)
  • To ensure you don't get build up, you'll need to rinse your diapers out thoroughly. There are a couple ways to tell if the soap is rinsed out enough. You can look in the washer during the rinse cycle. If there are bubbles, it still has soap in them. How do you tell air bubbles from soap bubbles? If the bubbles pop, it's just air, if they linger it's soap. The method I use is to smell them before putting them in the dryer. If I can strongly smell the detergent I do another rinse. I'm too busy to pay attention to what cycle my washer is on.
Here is where it gets more trial and error in finding what works for you. 

For my wash routine I do a cold rinse, hot wash with detergent, then a cold rinse. I recommend doing a cold rinse before you wash if you don't rinse your pee diapers. The rinse afterward is to get all the soap out. You may need two rinses, it just depends on how long it takes to get all the soap out. This is why you don't need very much detergent. If you use a whole cap full I can't even imagine how long it would take to get all the soap out of the diapers. I like doing a hot wash because I think hot water cleans better than cold. Honestly I can't tell you why I make my rinse after the hot wash cold, but I do. 

As far as detergents go, there are many opinions. I personally use Tide, which to some is a no-no. It works for me and I like it. Don't fix what's not broken, right? I asked a few of my cloth diapering friends what detergents they use and this is what they've told me. 

  • All Free and Clear small and mighty
  • Charlie's Soap
  • Rockin' Green
  • A Happy Green Life (Rainbow scent)
  • Homemade (borax, washing soda, and oxiclean baby mixture)
  • Coconut Rain
As you can see there are many different types of detergent that they are using. What works for one person may not work for you. Just keep in mind what is in the detergent that you are cleaning your diapers with. My homemade detergent that I make for our clothes, I would not use for cloth diapers. I grate up a bar of soap in my detergent and it can cause build up on the diapers making them not as absorbent.

I'm a mom of a 6 month old and a little sleep deprived lately. If something doesn't make sense, just ask me! I love teaching about cloth diapers. 

Wednesday, February 27, 2013

Cloth Diaper Pictures

Now that you've read the descriptions of the different cloth diapers, I want to show you so it's easier to understand. 

Prefold and Cover Cloth Diaper


After you wash your prefold multiple times, it will look textured like the picture above.  


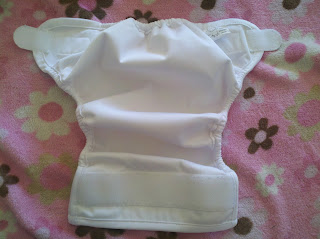
This is a Bummis Super Whisper Wrap. It's the water proof cover that you put on the outside of a folded prefold. 


One of the many folds you can do with a prefold. This is called a trifold. As you can see, you just lay it in the cover. Other folds you will have to secure it with a snappi, or pins, then put the cover on top. This particular cover has a pocket to hold the prefold in place.


The Bummis Super Whisper Wrap secures with velcro. You can also get covers that close with snaps. 


This is a prefold with the traditional safety pins to secure it. A lot of people prefer this style for premature or newborn babies. This sweet little girl is only 5 pounds 12 ounces.


Fitted Cloth Diapers


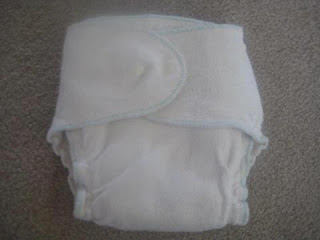
This is a  Growing Green Organic fitted diaper with snap closures. On top of this, you would put a cover. Some mom's don't actually put a cover on when they are at home and changing their baby often. The fitted diaper is not waterproof, so it's recommended to put a cover on top.


\
Green Mountain, Workhorse fitted diaper with snap closures. 


This cute little guy has on a fitted diaper that is being held closed by a Snappi, the alternative to the pins. 


The cover on top of the fitted diaper.


Pocket Cloth Diapers


This is a Fuzzibunz one size elite pocket diaper. 


The Fuzzibunz are shaped more narrow than other brands which helps with the fit. They are a little more of a chore to stuff. 


 Numbered slotted elastic for both leg openings and the rear/back elastic. Just push the button through the desired slot. This helps a lot with the fit of the diaper. 


More Fuzzibunz diapers with a microfiber insert. You can see how it fits on a baby!


Microfiber insert inside the "pocket".


This is a Kawaii one size pocket diaper. 


One size Sunbaby pocket diaper, on it's smallest setting. 


It has snaps on the side to adjust the size of the leg hole. 


Let all the way out on the biggest setting.


This is the leg hole on the biggest setting. As you can see it's much bigger than on the smallest setting, which helps to give you a custom fit. 


All in Two cloth diapers (AI2) 


This is a Grovia all in two, one size diaper. It has the snaps to adjust the rise of the diaper, and velcro to keep it closed. It comes in snaps as well. 


This shows the laundry tab. When you are washing your diapers with velcro, you want to fold it down so it doesn't get stuck on everything it touches.


This is the insert you snap inside of the outer, waterproof layer.


The inside of Grovia AI2's are mesh. It helps the diaper breathe and is still easy to clean. 


This is a Trend Lab, one size, all in two diaper. The insert you see on top can come off. You have the option to just remove the soiled insert, instead of the whole diaper 


All in One Cloth Diaper


Bumkins one size, all in one diaper (AIO). This diaper has everything attached together. The insert is long, and you fold it into the pocket in the back. 


Hybrid Cloth Diaper


Mabu Eco Diaper Hybrid system
From left to right: Outer shell, insert holder, cloth insert, disposable insert.


The holder snaps into the shell, then you can decide whether you want to use a disposable, or cloth insert. 


It fastens a lot like a disposable. You can change just the soiled insert. Cons are they are not one size, so you  have to buy larger sizes as they grow. If you decide to use disposable inserts, you have additional costs. 


Thank you to:

Alicia Smith for providing pictures and explanations of Bummis Super Whisper Wrap, Fuzzibunz pocket diapers, Grovia, and Trend Lap AI2's, and Mabu Eco hybrid diapers.

Laura Castillo for providing pictures and explination of prefold, Growing Green Organic fitted, and Green Mountain Workhorse fitted diapers.

Sian Sheaffer for providing pictures of a fitted and cover.

Andrea Burton for providing pictures of fuzzibunz pocket diapers.

Courtney Eastepp for providing pictures of Kawaii pocket diapers. 

Kasey Duffy for providing pictures and explanation of the Bumkins AIO diaper.  


Tuesday, February 19, 2013

Cloth Diaper Facts and Explanation

It's time to educate everyone on cloth diapering. We need to get rid of this stigma that you put a huge bulky cloth on your baby and safety pin it. Times have changed and they have made cloth diapering even easier than it once was. I'm bringing in my cloth diapering friends to help give different perspectives and experiences. Making the decision to cloth diaper is an easy one once you get all the facts. It can also be overwhelming. There are different styles, brands, accessories, and they're all thrown at you all at once. Hopefully I can break it down so it's a little easier to understand. I'll be making multiple posts about cloth diapering. From the different styles, to wash routines, to what kind of detergents to use. Keep in mind that I will be giving you the basic facts, and the rest will be opinions. 

Why should I cloth diaper?
Did you know that about 40 million diapers are used in the US every day? That translates into about 1,816 tons of diapers used each day in the US alone according to The Disposable Diaper Industry Source. Those diapers obviously go to landfills. We produce enough garbage as it is, why add diapers to that when we can use cloth?  

Disposable diapers contain chemicals and man made materials. A couple of those things being acrylic acid, and Sodium Polyacrylate These ingredients make disposable diapers absorbent. Sodium polyacrylate has been banned from tampons because it was causing toxic shock syndrome. (yikes!) These pull moisture away from the body, including the necessary moisture. You could probably conclude that this is a big reason why children that are in disposables get diaper rashes way more frequently then cloth diapered babies. I don't like the idea of putting this kind of stuff in the most delicate area of a baby. With cloth, you know exactly what is on your child's body for the first 2+ years of their life. Or even less time, because it's been shown that cloth diapered babies potty train sooner than disposable using children. 

The savings you get by cloth diapering is incredible. You can make cloth diapering as inexpensive, or expensive as you would like. Lets say you go the route I went and buy 24 diapers for $120. (I'll go into detail about this later on) Those 24 diapers should last until my son is potty trained. Unless he decides to be a giant child, in that case I would need to buy a larger size. Not only will it last through your child's diaper years, but it will last through multiple children's diaper years. There will be some that wear out and you have to replace, but for the most part you'll get years of use. That's about the same cost as 5 boxes of pampers swaddlers that contain 96 diapers. Cloth diapers actually hold some of their value too. Lets say you have a boy first and get all excited about the cute boy prints, and buy nothing gender neutral. The next child you have is a girl and you don't want her to be in boy themed diapers. If you take care of  your diapers you can sell them for about 50% less than what you paid for them new. You can't sell those used pampers. The same concept applies to the more expensive cloth diapers. 

How much time will it cost me to use cloth?
It's a lot less work than you think to use cloth diapers. Typically you wash every 2-3 days depending on how many diapers you have. I rinse the diaper out after I change him, whether it was pee or poop. That adds maybe one or two minutes more than throwing the disposable in the trash can. You don't even have to rinse out the pee diapers if you don't want to. Washing them is a matter of turning on your washing machine and throwing them in. You can chose to either hang dry, or dry them on low in your dryer. Most people will recommend using a drying rack because it will extend the life of your diaper. The most time consuming part is putting them away after they are dry. How much time this takes will depend on the type of diaper you have. It shouldn't take more than 10 minutes of watching TV while stuffing diapers to finish and put them away. (I'll explain the different types later on, and "stuffing diapers" will make sense) So all in all you might be spending 30 minutes more a week then you would on disposables. 

What are the different types of cloth diapers?

Flat or Pre-fold Cloth diapers: These are the more traditional style of cloth. You take a square thin cloth, fold it, place around their bum and pin it. I guess you could use the old fashioned pins, but lucky for us they have a more modern invention called Snappi fasteners. On top of these you would put a waterproof cover. They can also be used inside pocket diapers as the insert. There are many different types of folds that you can adjust as your baby grows and diapering needs change. 

Contour Cloth Diaper: Contour diapers are similar to flat's in the sense that you have to use a snappi and cover. The difference is you don't have to fold contours. Instead of being a square piece of fabric it is pre-cut to fit your baby. You put this on like you would a regular diaper, close it with a snappi, and put your cover on. Some don't like these over the flats because you don't get as custom of a fit for your baby like you can with different folds. 

Fitted Cloth diapers: A fitted diaper has two separate parts you put on, one being a cover. The fitted diaper is a thick cloth that has elastic around the legs and top. You put this on first. It has snaps or velcro to keep it closed. It's not water proof so you will need a cover for this style as well. 

Pocket Cloth Diapers: Pocket diapers are made of two layers that are sewn together and an insert is added between them. The outer layer is waterproof, and the inner layer is a soft cloth that is moisture wicking, meaning it pulls the moisture away from your baby. In between those layers is where you add the insert, hence the name "pocket diaper". There are quite a few varieties of materials the inserts can be made from. Some of the more popular kinds are microfiber, bamboo, hemp, and cotton. 

All in Two Cloth Diapers (AI2): All in two diapers are basically how they sound. They have two pieces to them. They have the waterproof outer layer with a soft inner layer that are sewn together. These diapers you actually add the insert on the inner layer of the shell, and not in a pocket. Some you just lay in, and some have snaps. 

All in One Cloth Diapers (AIO): All in one diapers are the easiest cloth diaper out there. They have the waterproof outer layer, and the absorbent layers all in one diaper. You simply have to snap or Velcro on. Some people don't like them because they take longer to dry and find that you need to do extra washes and rinses to get them clean because the layers don't come apart.  

Hybrid Cloth Diaper: These diapers have 3 parts. It has an outer shell, insert holder, then the insert. You attach the insert holder to the outer shell, these are both washable. Then you have the decision to use a cloth insert, or disposable. Obviously the disposable is one extra cost that you have to keep up on. 

Don't get overwhelmed yet! Now that I have explained them, it might be hard to visualize. Check back, because my next post will be pictures of each kind with explanations! Once you see them, it will be much easier to see how they work. 


Sunday, February 17, 2013

Going crunchy

I've always had a pretty open mind about what kind of mom I would become. I didn't want to be one of those girls that said "I will never..." then do every single one of those things. That being said, I never thought I would be the way I am now. 

It all started when I was pregnant with Carsen and I decided to start making my own laundry detergent. I loved the fact that I knew what ingredients my clothes were being cleaned in. Plus, the cost of making your own is next to nothing. Seriously, the cost of all the ingredients was $10. Do you know how long that $10 worth of stuff will last me? Almost a year. I only have to make detergent every two months and it takes about 15-20 minutes. If you're not sold on making your detergent by now, you're a little crazy. 

After that I was starting to be more aware of chemicals and additives. That's when people in my online pregnancy group started talking about cloth diapering. My first thought was like most people's... gross. Then the idea started to grow on me. There are so many good things about cloth diapering and I got talked into it, and I am so glad!

Once my sweet baby came into the world things started to matter even more. I didn't want formula to be an option so I stuck with breastfeeding. I don't think there is anything wrong with formula, I just wanted to give him the perfectly tailored food for his body. I pushed through those nights where my child is screaming too upset to eat and sleep feels like a distant memory. Breastfeeding is not for the weak! 

I make my own laundry detergent, cloth diaper, breastfeed, think coconut oil can fix anything, make my own wipes, plan on making my own baby food, and am opening myself up to more clean and organic solutions. I am going crunchy. 


In case you want the recipe for my awesome detergent here is the link. I make liquid.

http://wellnessmama.com/462/how-to-make-nautral-homemade-laundry-detergent/